


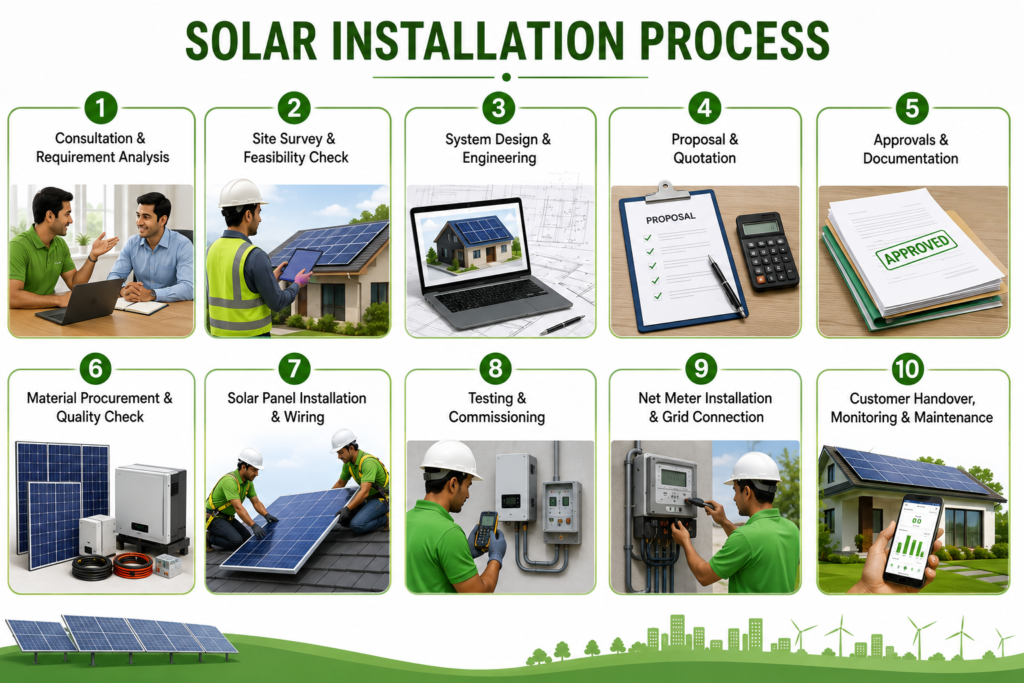
Solar installation process is the complete journey of setting up a solar power system on your home, business, or industrial building. It begins with understanding your electricity usage and checking whether your roof is suitable for solar panels. After that, experts design a solar system based on your energy needs, prepare a quotation, and help with government approvals such as subsidy and net metering, if applicable. Once everything is approved, the installation team fixes the mounting structure, installs the solar panels, inverter, and electrical wiring, and then tests the entire system to ensure it works safely and efficiently. Finally, a net meter is installed, and your solar system starts generating clean electricity from sunlight. A professionally installed solar system can reduce electricity bills, provide reliable power for over 25 years, and help protect the environment by using renewable energy instead of fossil fuels.
Step 1: Initial Consultation
What is the Initial Consultation in the Solar Installation Process?
The initial consultation is the first step in the solar installation process. During this stage, the solar company learns about your electricity needs and suggests the best solar solution for your home or business. The team collects important information, such as your monthly electricity bill, the type of building you have, and how much electricity you use every day. This helps them recommend the right solar system size and estimate how much money you can save after installing solar panels.
A good initial consultation is important because it helps avoid choosing a system that is too small or too large. It also gives you a clear idea about the project cost, expected savings, installation timeline, and available government subsidies.
Why is the Initial Consultation Important?
Many people think all solar systems are the same, but every building has different electricity needs. A family living in a small home uses less electricity than a factory or a large commercial building. Installing the wrong system size can reduce your savings and affect the performance of your solar power system.
The initial consultation helps the solar company understand your requirements before designing the system. It also allows you to ask questions and understand how solar energy works.
A proper consultation helps you:
- Choose the correct solar system capacity.
- Estimate your monthly electricity savings.
- Understand the project cost.
- Learn about government subsidy options.
- Know the installation process and timeline.
- Plan your investment with confidence.
What Information Does the Solar Company Collect?
During the consultation, the solar expert collects a few basic details to prepare the right recommendation.
1. Monthly Electricity Bill
Your electricity bill helps the company understand how much power you use every month. Based on this information, they calculate the recommended solar system size.
For example:
- ₹2,000 monthly bill may require a smaller system.
- ₹10,000 monthly bill may need a larger system.
- Commercial buildings often require higher-capacity solar systems.
2. Property Type
The company checks whether the installation is for:
- Residential home
- Apartment
- Villa
- Shop
- Office
- School
- Hospital
- Factory
- Warehouse
Each property has different power requirements, so the system design changes accordingly.
3. Roof Details
The team asks basic questions about your roof, such as:
- Is the roof made of concrete or metal?
- Is it flat or sloped?
- Is there enough open space?
- Are there any nearby trees or buildings creating shade?
These details help determine whether your roof is suitable for installing solar panels.
4. Location
The location of your property is also important. Different areas receive different amounts of sunlight throughout the year. Local electricity regulations and net metering policies may also vary.
5. Future Electricity Needs
The consultant may ask if you are planning to buy:
- An electric vehicle (EV)
- An air conditioner
- New machinery
- Additional electrical appliances
Planning for future energy needs helps ensure your solar system continues to meet your requirements for many years.
How Does the Company Recommend the Right Solar System?
After collecting all the required information, the solar expert estimates the ideal system size. They consider:
- Your average monthly electricity consumption
- Available rooftop space
- Daily sunlight at your location
- Your budget
- Future power requirements
- Government policies and subsidy eligibility
The goal is to recommend a system that provides maximum savings and long-term value.
Questions You Should Ask During the Initial Consultation
Before moving to the next step, ask the solar company a few important questions.
- What solar system size do you recommend?
- How much electricity will the system generate?
- How much can I save every month?
- What is the total installation cost?
- Am I eligible for a government subsidy?
- What warranties are included?
- How long will the installation take?
- Will you help with net metering and approvals?
- Do you provide after-sales service and maintenance?
These questions help you make an informed decision and compare different solar providers.
Common Mistakes to Avoid
Many customers make simple mistakes during the consultation stage. Avoid these to get the best results.
- Choosing the cheapest option without checking quality.
- Hiding future electricity requirements.
- Sharing incorrect electricity bill details.
- Ignoring roof conditions or shading issues.
- Not asking about warranties and maintenance.
- Selecting a company without experience or proper certifications.
Step 2: Site Survey
What is a Site Survey in the Solar Installation Process?
A site survey is the second step in the solar installation process. After the initial consultation, a solar engineer visits your property to inspect the roof and collect technical details. The purpose of the survey is to make sure your building is suitable for a solar power system and to gather accurate measurements before installation begins.
During the site survey, the engineer checks the roof size, roof strength, sunlight availability, shadow conditions, electrical connections, and the best location for installing solar panels and the inverter. This step helps the company design a safe, efficient, and long-lasting solar system.
A professional site survey reduces installation errors and ensures your solar system delivers the highest possible energy generation.
Why is a Site Survey Important?
A solar system can only perform well if it is installed in the right place. Even a small mistake, such as installing panels where there is too much shade, can reduce electricity generation.
The site survey helps the installation team understand your property and plan the project correctly before any equipment is ordered or installed.
A proper site survey helps to:
- Measure the available rooftop space accurately.
- Find the best direction for solar panels.
- Identify nearby trees or buildings that create shade.
- Check whether the roof can safely support the solar system.
- Plan cable routing and inverter placement.
- Improve energy generation and system efficiency.
- Avoid unexpected problems during installation.
What Happens During a Solar Site Survey?
A trained solar engineer follows a detailed inspection process to collect all the information needed for system design.
1. Roof Inspection
The engineer carefully checks your roof to see if it is suitable for solar panel installation.
During the inspection, they look at:
- Roof type (concrete, metal sheet, tile, or asbestos-free roofing)
- Roof condition
- Roof age
- Available installation area
- Roof accessibility
If any repairs are needed, they may recommend fixing the roof before installing the solar system.
2. Roof Space Measurement
The engineer measures the usable rooftop area.
Not every part of the roof can be used because space is needed around:
- Water tanks
- Staircases
- Chimneys
- Vent pipes
- Satellite dishes
- Air conditioning units
Only the open area with maximum sunlight is selected for installing solar panels.
3. Shadow Analysis
One of the most important parts of the survey is checking for shade.
The engineer looks for objects that may block sunlight, such as:
- Tall buildings
- Trees
- Mobile towers
- Water tanks
- Electric poles
- Nearby structures
Even a small amount of shade can reduce the performance of the entire solar system. That is why solar panels are installed where they receive the maximum amount of sunlight throughout the day.
4. Roof Direction and Tilt
The direction in which solar panels face affects how much electricity they produce.
The engineer checks:
- Roof orientation
- Roof angle
- Best panel placement
- Seasonal sunlight conditions
If needed, special mounting structures are used to improve the angle of the solar panels and increase energy generation.
5. Structural Strength Check
Solar panels and mounting structures add weight to the roof.
The engineer checks whether the building can safely support the complete solar system without affecting the structure.
This inspection is especially important for older buildings and commercial properties.
6. Electrical Inspection
The electrical system is also inspected to ensure a safe connection.
The engineer checks:
- Main electrical panel
- Existing wiring
- Earthing system
- Distribution board
- Meter location
- Inverter installation area
This helps the installation team plan safe electrical connections.
Tools Used During a Site Survey
Professional solar companies use different tools to collect accurate measurements.
Some commonly used tools include:
- Measuring tape
- Laser distance meter
- Digital compass
- Mobile survey applications
- Camera for site photographs
- Roof measurement tools
- Electrical testing equipment
These tools help prepare an accurate solar system design.
What Documents May Be Required?
During the site survey, the company may ask for a few basic documents.
These may include:
- Recent electricity bill
- Customer identification proof
- Property ownership details (if required)
- Building address
- Contact information
These documents help prepare the quotation and complete the approval process later.
Common Mistakes Found During a Site Survey
A professional survey helps identify problems before installation begins.
Some common issues include:
- Too much shade on the roof
- Limited rooftop space
- Weak roof structure
- Poor earthing
- Old electrical wiring
- Obstructions that reduce panel placement
- Unsafe access to the rooftop
Finding these issues early saves time, money, and avoids delays during installation.
Tips for Homeowners Before the Site Survey
You can make the survey process easier by preparing a few things in advance.
- Keep your latest electricity bill ready.
- Ensure easy access to the rooftop.
- Inform the engineer about future electricity needs.
- Share details of any planned building extensions or renovations.
- Mention any existing electrical issues.
Providing complete information helps the engineer recommend the most suitable solar solution.
Step 3: Solar System Design
What is Solar System Design?
Solar system design is the process of planning how your solar power system will be built. After the site survey is complete, solar engineers use the collected information to design a system that matches your electricity needs, rooftop space, and budget.
The design includes the system capacity, number of solar panels, inverter size, panel layout, mounting structure, cable routing, and safety equipment. A well-designed solar system generates more electricity, reduces your electricity bills, and works efficiently for many years.
Every building is different, so the design should always be customized. A professional solar system design helps you get the best performance and the highest return on your investment.
Why is Solar System Design Important?
A good design is the foundation of a successful solar project. Even if you use high-quality solar panels, poor planning can reduce the system’s performance.
A properly designed solar system helps you:
Generate maximum electricity.
Reduce monthly electricity bills.
Use rooftop space efficiently.
Improve system safety.
Increase the lifespan of your solar system.
Avoid unnecessary installation costs.
Get better long-term savings.
What Happens During Solar System Design?
After the site survey, the engineering team starts designing the complete solar power system.
1. Calculate Your Electricity Requirement
The first step is to understand how much electricity you use every month.
The engineer studies your electricity bills to calculate your average monthly power consumption. This helps determine the right solar system capacity.
For example:
| Monthly Electricity Bill | Recommended Solar System* |
|---|---|
| ₹1,500 – ₹2,500 | 1–2 kW |
| ₹2,500 – ₹5,000 | 2–3 kW |
| ₹5,000 – ₹8,000 | 3–5 kW |
| ₹8,000 – ₹15,000 | 5–10 kW |
| Above ₹15,000 | Customized System |
*The actual system size depends on your electricity usage, rooftop area, location, and local sunlight conditions.
2. Decide the Right Solar System Capacity
The next step is selecting the correct system size.
A system that is too small may not produce enough electricity, while a system that is too large may increase the initial investment without providing additional benefits.
The engineer considers:
Monthly electricity consumption
Future electricity needs
Available rooftop space
Budget
Government regulations
Net metering policy
The goal is to install a system that gives the best balance between cost and savings.
3. Select the Right Solar Panels
Solar panels are the main part of the system because they convert sunlight into electricity.
The engineer selects the panels based on:
Panel efficiency
Power output
Warranty
Roof space
Weather conditions
Long-term performance
Using high-quality solar panels improves electricity generation and increases the life of the system.
4. Choose the Right Solar Inverter
The inverter converts the electricity produced by the solar panels into usable electricity for your home or business.
The inverter is selected according to:
Solar system capacity
Electrical load
Safety requirements
Future expansion plans
Choosing the correct inverter improves efficiency and ensures smooth operation.
5. Design the Panel Layout
The engineering team prepares a layout showing where every solar panel will be installed.
The layout is planned to:
Receive maximum sunlight.
Reduce shading.
Leave space for maintenance.
Improve airflow around the panels.
Use the rooftop efficiently.
Proper panel placement increases electricity generation throughout the year.
6. Design the Mounting Structure
The mounting structure holds the solar panels securely on the roof.
The structure is designed according to:
Roof type
Wind conditions
Panel weight
Roof angle
Building strength
A strong mounting structure protects the panels during heavy rain and strong winds.
7. Plan the Electrical Connections
The engineer prepares the electrical layout before installation begins.
This includes:
Cable routing
Inverter location
Earthing points
AC and DC connections
Distribution board connection
Safety switches
Proper planning reduces power loss and improves safety.
8. Estimate Solar Energy Generation
The design team estimates how much electricity the system will produce every month.
The estimate depends on:
Solar system capacity
Local sunlight hours
Roof direction
Panel efficiency
Weather conditions
This estimate helps you understand how much electricity your system can generate and how much you may save on your electricity bills.
9. Calculate Expected Savings
One of the most important parts of the design process is calculating your expected savings.
The company estimates:
Monthly electricity generation
Monthly electricity bill savings
Annual savings
Payback period
Long-term financial benefits
These estimates help you understand the value of investing in solar energy.
What Does the Final Solar Design Include?
After completing the planning process, the company prepares a detailed solar system design.
The design usually includes:
Recommended solar system capacity
Number of solar panels
Solar panel layout
Inverter details
Mounting structure design
Electrical layout
Estimated monthly generation
Estimated savings
Project cost
Warranty details
This design acts as the blueprint for the installation team.
Common Mistakes to Avoid During Solar System Design
A professional design helps avoid many common problems.
Some mistakes include:
Choosing the wrong system size.
Ignoring future electricity needs.
Installing panels in shaded areas.
Using poor-quality components.
Not planning cable routes properly.
Selecting an undersized inverter.
Wasting available rooftop space.
Avoiding these mistakes helps your solar system perform better for many years.
Tips for Choosing the Right Solar System
Before approving the final design, keep these points in mind:
Compare system performance, not just the price.
Choose high-quality solar panels and inverters.
Ask for estimated monthly electricity generation.
Check product and installation warranties.
Ensure the design allows easy maintenance.
Work with an experienced solar EPC company.
A well-designed system will deliver better performance and lower maintenance costs over its lifetime.
Step 4: Solar Quotation and Project Proposal
What is a Solar Quotation and Project Proposal?
After the solar system design is completed, the solar company prepares a solar quotation and project proposal. This document explains everything about your solar project, including the recommended system size, equipment, total cost, estimated electricity generation, expected savings, installation timeline, and warranty.
A solar quotation helps you understand what you are paying for and what you will receive. It also allows you to compare different solar companies before making your final decision.
Before accepting any quotation, read every detail carefully. A clear and transparent quotation shows that the company is professional and trustworthy.
Why is a Solar Quotation Important?
A solar power system is a long-term investment. Choosing the right company is not only about getting the lowest price. It is also about getting high-quality products, professional installation, and reliable after-sales support.
A detailed quotation helps you:
Understand the total project cost.
Know which products will be installed.
Compare different solar companies.
Estimate your monthly savings.
Calculate the return on your investment.
Avoid hidden charges.
Make an informed decision.
A good quotation gives you confidence before moving to the installation stage.
What Does a Solar Quotation Include?
A professional solar quotation should clearly explain every part of the project.
1. Recommended Solar System Size
The quotation starts by showing the recommended solar system capacity.
For example:
2 kW Solar System
3 kW Solar System
5 kW Solar System
10 kW Solar System
Custom Commercial Solar System
The recommended size is based on your electricity usage, rooftop space, and future energy needs.
2. List of Equipment
The quotation includes the main components that will be installed.
These usually include:
Solar panels
Solar inverter
Mounting structure
DC and AC cables
Earthing kit
Lightning protection system (if applicable)
Distribution box
Safety accessories
Knowing the equipment helps you understand the quality of the system.
3. Project Cost
The quotation clearly mentions the total installation cost.
The cost generally includes:
Solar equipment
Installation charges
Electrical work
Mounting structure
Transportation
Testing and commissioning
Ask the company whether taxes, approvals, and net metering charges are included in the price.
4. Estimated Monthly Electricity Generation
The proposal includes an estimate of how much electricity your solar system is expected to generate every month.
The estimate depends on:
System capacity
Sunlight at your location
Roof direction
Weather conditions
This estimate helps you understand the expected performance of your solar system.
5. Estimated Savings
The quotation also explains how much money you may save after installing solar panels.
It may include:
Monthly electricity bill savings
Annual savings
Total savings over the system’s lifetime
These figures help you understand the financial benefits of switching to solar energy.
6. Payback Period
The payback period tells you how long it may take to recover your investment through electricity bill savings.
For many residential solar systems, the payback period depends on factors such as electricity usage, local tariff rates, system size, and available government incentives.
After the payback period, the electricity generated by your solar system continues to provide savings for many more years with proper maintenance.
7. Warranty Details
A good quotation clearly explains the warranties provided for the solar system.
These may include:
Solar panel warranty
Inverter warranty
Installation workmanship warranty
Mounting structure warranty
Always ask the company to explain what each warranty covers and the process for making a warranty claim.
8. Installation Timeline
The proposal should mention the expected project schedule.
It may include:
Site preparation
Material delivery
Solar panel installation
Electrical work
Testing
Commissioning
Net meter application
Knowing the timeline helps you plan the project without confusion.
Questions to Ask Before Accepting the Quotation
Before signing the agreement, ask the solar company a few important questions.
Are all installation charges included?
Which brands of solar panels and inverters will be used?
What is the estimated monthly electricity generation?
How much can I expect to save each month?
What warranties are included?
Will the company assist with subsidy and net metering?
Who will handle installation and future service?
Are there any additional charges after installation?
These questions help you understand the proposal and avoid misunderstandings later.
Common Mistakes to Avoid
Many customers focus only on the lowest price, but this can lead to problems in the future.
Avoid these common mistakes:
Choosing the cheapest quotation without checking product quality.
Ignoring warranty terms and service support.
Not reading the complete proposal.
Overlooking hidden costs or additional charges.
Comparing prices without comparing equipment specifications.
Selecting a company with limited installation experience.
Remember, a high-quality solar system can deliver reliable performance for decades, making quality and service just as important as the initial cost.
Tips for Comparing Solar Quotations
If you receive quotations from more than one company, compare them carefully.
Check the following:
Recommended system capacity
Solar panel specifications
Inverter specifications
Total project cost
Estimated electricity generation
Expected savings
Warranty coverage
Installation timeline
After-sales service
Customer support
Comparing these points will help you choose the solution that offers the best value rather than simply the lowest price.
Step 5: Government Approvals, Subsidy, and Net Metering
What Are Government Approvals in the Solar Installation Process?
After you approve the quotation, the next step is getting the required government approvals. These approvals ensure that your solar system follows local electricity rules and safety standards. If you are eligible, you can also apply for a government subsidy and net metering during this stage.
Most professional solar installation companies help customers complete the required paperwork and submit applications. This makes the process easier and saves time.
Government approvals are important because they allow your solar system to operate legally and safely. Without the necessary approvals, your system may not qualify for subsidy benefits or be connected to the electricity grid.
Why Are Government Approvals Important?
Government approvals protect both the customer and the electricity distribution company. They make sure the solar system is designed correctly and meets the required technical standards.
Completing this step helps you:
Install your solar system legally.
Apply for eligible government subsidy programs.
Get approval for net metering.
Connect your solar system to the electricity grid.
Ensure safe and reliable operation.
Avoid delays after installation.
What Is a Solar Subsidy?
A solar subsidy is financial support provided by the government to encourage people to install rooftop solar systems. The subsidy helps reduce the overall cost of installation for eligible residential consumers.
The amount of subsidy depends on the government scheme and the capacity of the solar system. Eligibility rules and subsidy amounts may change over time, so always check the latest official government guidelines or ask your solar installation company for updated information.
A professional solar company can guide you through the application process and help you submit the required documents.
What Is Net Metering?
Net metering is a billing system that allows you to send extra electricity generated by your solar panels to the electricity grid.
During the daytime, your solar system may produce more electricity than your home or business uses. Instead of wasting this extra electricity, it is exported to the grid through a net meter.
When your solar system is not generating enough electricity, such as at night or during cloudy weather, you can use electricity from the grid.
This system helps you make better use of the electricity generated by your solar panels and can reduce your electricity bills.
What Documents Are Usually Required?
The exact documents may vary depending on your state, electricity distribution company, and government policies.
Commonly required documents include:
Identity proof
Address proof
Recent electricity bill
Property ownership documents (where applicable)
Passport-size photograph
Solar system details
Signed application forms
Your solar installation company will usually tell you which documents are required and help you complete the process.
How Does the Approval Process Work?
Although the process may differ slightly across locations, the general steps are similar.
1. Submit the Application
The required documents and project details are submitted to the electricity distribution company or the appropriate government portal.
2. Document Verification
The authorities review the submitted documents and verify the application details.
If additional information is required, they may contact you or your installation company.
3. Technical Review
The electricity distribution company checks whether the proposed solar system meets technical requirements and is suitable for grid connection.
4. Approval
Once all requirements are satisfied, the application is approved, allowing the project to move forward according to the applicable procedures.
How Long Does the Approval Process Take?
The approval timeline depends on several factors, including:
Local electricity distribution company procedures
Government processing time
Accuracy of submitted documents
Type and size of the solar project
Submitting complete and correct documents helps avoid unnecessary delays.
How Can You Make the Process Easier?
You can help speed up the approval process by following a few simple steps.
Keep all required documents ready.
Provide accurate information in the application.
Respond quickly if additional documents are requested.
Work with an experienced solar installation company.
Keep copies of all submitted documents for future reference.
Common Mistakes to Avoid
Many project delays happen because of simple mistakes during the approval stage.
Avoid these common issues:
Submitting incomplete documents.
Providing incorrect information.
Delaying document submission.
Ignoring communication from the electricity distribution company.
Not checking eligibility requirements before applying.
Choosing an installer who does not assist with approvals.
Taking care during this stage helps your project move smoothly to the installation phase.
Questions You Can Ask Your Solar Company
Before the approval process begins, consider asking these questions:
Will you help with the subsidy application?
Will you handle the net metering process?
Which documents do I need to provide?
How long is the approval process expected to take?
Who will keep me updated on the application status?
Are there any government fees that I need to pay?
Clear communication helps you understand the process and avoid confusion.
Step 6: Material Procurement and Quality Inspection
What is Material Procurement in the Solar Installation Process?
After all approvals are completed, the next step is material procurement. This is the process of selecting, ordering, inspecting, and delivering all the equipment required for your solar power system.
A solar system is made up of many components that work together to generate electricity. These include solar panels, an inverter, a mounting structure, electrical cables, safety devices, and other accessories. Before installation begins, every component is checked to ensure it matches the approved system design and meets quality standards.
Using high-quality materials is one of the most important factors in the performance and lifespan of a solar power system. Good-quality equipment generates more electricity, requires less maintenance, and can operate reliably for more than 25 years.
Why is Material Procurement Important?
Many people believe that all solar panels and inverters are the same, but this is not true. The quality of the equipment has a direct impact on how much electricity your system generates and how long it lasts.
Proper material procurement helps to:
Ensure all equipment matches the approved design.
Improve the performance of the solar system.
Reduce the chance of equipment failure.
Increase the lifespan of the system.
Ensure safe installation.
Avoid project delays caused by missing materials.
Using certified and reliable products also provides better warranty support and long-term peace of mind.
What Materials Are Required for a Solar Installation?
A rooftop solar system consists of several important components. Each one has a specific role in generating and delivering electricity safely.
1. Solar Panels
Solar panels capture sunlight and convert it into electricity. They are the main part of the solar system and are installed on the rooftop where they receive maximum sunlight.
The number of panels depends on the approved system size and the available roof space.
2. Solar Inverter
The solar inverter converts the electricity generated by the solar panels into electricity that can be used by your home or business.
Choosing the correct inverter is important because it affects the efficiency and overall performance of the system.
3. Mounting Structure
The mounting structure supports the solar panels and keeps them securely fixed to the roof.
A strong and corrosion-resistant structure helps protect the panels from heavy rain, strong winds, and changing weather conditions.
4. Electrical Cables
Special solar-grade cables are used to connect the solar panels, inverter, and electrical distribution system.
Good-quality cables help reduce power loss and improve the safety of the installation.
5. Earthing System
The earthing system protects people and equipment from electrical faults.
Proper earthing is an important safety requirement for every solar installation.
6. Safety Equipment
Depending on the system design, the installation may also include:
Distribution boxes
DC isolators
AC isolators
Circuit breakers
Surge protection devices
Connectors and junction boxes
These components improve electrical safety and protect the system from faults.
How is the Equipment Checked Before Installation?
Before the installation team starts work, every major component is inspected.
The quality inspection usually includes:
Product Verification
The team checks whether the delivered products match the approved quotation and system design.
Physical Inspection
Each component is inspected for visible damage that may have occurred during transportation or handling.
Quantity Check
The installation team confirms that all required materials have been delivered before work begins.
This helps prevent unnecessary delays during installation.
Warranty Verification
The warranty details for major equipment are verified so that customers receive the promised product support.
How Are Materials Stored Before Installation?
Solar equipment should be stored carefully until installation begins.
Professional installation companies usually:
Keep solar panels in a safe and dry place.
Protect equipment from dust and moisture.
Handle panels carefully to avoid damage.
Organize materials according to the installation plan.
Proper storage helps maintain product quality before installation.
Common Mistakes to Avoid
Using poor-quality materials can reduce the performance and life of your solar system.
Avoid these common mistakes:
Choosing products based only on the lowest price.
Ignoring product warranties.
Using damaged equipment.
Mixing components that are not compatible.
Purchasing uncertified products.
Starting installation before checking all materials.
Selecting reliable equipment is an investment in the long-term performance of your solar power system.
Tips for Choosing Quality Solar Equipment
When reviewing the materials for your project, consider these points:
Choose products from trusted manufacturers.
Ask about product warranties.
Ensure all equipment matches the approved design.
Check that the mounting structure is suitable for your roof.
Confirm that solar-grade cables and safety devices will be used.
Ask your installer to explain the function of each major component.
Understanding the equipment helps you make informed decisions and gives you confidence in your investment.
Step 7: Solar Panel Installation
What is Solar Panel Installation?
Solar panel installation is the most important step in the solar installation process. This is the stage where the approved solar system design becomes a working power system. Skilled technicians install the mounting structure, fix the solar panels, connect the inverter, complete the electrical wiring, and prepare the system for testing.
Every installation is carried out according to the approved design to ensure the system is safe, reliable, and efficient. A professionally installed solar system can generate clean electricity for more than 25 years with proper maintenance.
The quality of installation is just as important as the quality of the equipment. Even the best solar panels cannot perform well if they are installed incorrectly.
Why is Proper Solar Panel Installation Important?
A rooftop solar system is exposed to sunlight, rain, wind, and changing weather conditions every day. Proper installation helps the system work safely and efficiently for many years.
A professional installation helps to:
Generate maximum electricity.
Improve system efficiency.
Increase the lifespan of the equipment.
Ensure electrical safety.
Protect the roof from damage.
Reduce future maintenance costs.
Improve long-term savings.
How is a Solar Panel Installed?
The installation team follows a planned process to complete the work safely and accurately.
Step 1: Prepare the Rooftop
Before installing any equipment, the team prepares the rooftop.
This includes:
Cleaning the installation area.
Removing unnecessary objects.
Marking the locations for the mounting structure.
Checking roof measurements again.
Ensuring safe access for the installation team.
A clean and well-prepared roof makes the installation faster and more accurate.
Step 2: Install the Mounting Structure
The mounting structure is installed first because it supports the entire solar system.
The installation team:
Fixes the base supports securely to the roof.
Aligns the structure according to the approved design.
Checks the correct tilt and direction.
Tightens all bolts and fasteners.
The structure must be strong enough to withstand heavy rain, strong winds, and changing weather conditions.
Step 3: Install the Solar Panels
Once the mounting structure is ready, the solar panels are carefully placed and secured.
During this step, the technicians:
Lift each panel carefully.
Position the panels according to the layout design.
Secure every panel firmly.
Maintain proper spacing between panels for airflow and maintenance.
Correct panel placement helps capture maximum sunlight throughout the day.
Step 4: Connect the Solar Panels
After all the panels are installed, they are connected using solar-grade connectors and cables.
The technicians ensure:
Proper electrical connections.
Correct panel sequence.
Secure cable connections.
Protection against loose wiring.
Careful wiring reduces energy loss and improves overall system performance.
Step 5: Install the Solar Inverter
The inverter is usually installed close to the main electrical panel in a safe and well-ventilated location.
The installation team:
Fixes the inverter securely.
Connects the DC cables from the solar panels.
Connects the AC output to the building’s electrical system.
Checks all electrical connections.
Proper inverter installation helps the system operate efficiently and safely.
Step 6: Install the Earthing System
Earthing is an important safety feature in every solar installation.
The earthing system helps protect:
Solar panels
Inverter
Electrical equipment
Building occupants
Proper earthing reduces the risk of electrical faults and improves system safety.
Step 7: Install Safety Devices
The installation team installs safety equipment to protect the solar system during normal operation and unexpected electrical events.
Depending on the project, this may include:
AC distribution box
DC distribution box
Circuit breakers
Isolator switches
Surge protection devices
These components help improve electrical safety and simplify future maintenance.
Step 8: Organize and Secure the Cables
After all equipment is connected, the cables are arranged neatly.
The team ensures that:
Cables are properly supported.
Loose wires are secured.
Cable routes are protected.
Electrical connections are clearly identified.
Good cable management improves safety and gives the installation a clean, professional appearance.
Safety Measures During Solar Installation
Safety is always the highest priority during installation.
Professional installation teams follow safety practices such as:
Wearing helmets, gloves, and safety shoes.
Using fall protection while working on rooftops.
Turning off electrical supply before making connections.
Using insulated tools.
Following electrical safety standards.
Keeping the work area clean and organized.
These measures help protect both the installation team and the property owner.
How Long Does Solar Panel Installation Take?
The installation time depends on the size and complexity of the project.
In general:
| Solar System Size | Typical Installation Time |
|---|---|
| 1–3 kW | About 1 day |
| 3–5 kW | 1–2 days |
| 5–10 kW | 2–3 days |
| 10–50 kW | 3–7 days |
| Commercial & Industrial Systems | Depends on project size and design |
The actual timeline may vary depending on weather conditions, roof type, and site requirements.
Quality Checks During Installation
Throughout the installation process, the team performs regular quality checks.
These checks include:
Confirming the mounting structure is secure.
Verifying panel alignment.
Inspecting electrical connections.
Checking cable routing.
Ensuring all safety devices are installed.
Comparing the installation with the approved design.
Regular inspections help identify and correct any issues before the system is commissioned.
Common Installation Mistakes to Avoid
Proper installation helps avoid problems that can reduce system performance.
Common mistakes include:
Incorrect panel alignment.
Loose electrical connections.
Poor cable management.
Inadequate earthing.
Installing panels in shaded areas.
Damaging panels during handling.
Ignoring manufacturer installation guidelines.
Working with experienced professionals helps prevent these issues.
Tips for Homeowners During Installation
You can help the installation process run smoothly by following these simple tips:
Keep the rooftop accessible.
Remove unnecessary items from the installation area.
Keep children and pets away from the work zone.
Discuss any concerns with the installation supervisor.
Check that the installed equipment matches the approved quotation.
A final walkthrough with the installation team is also a good opportunity to understand the system before testing begins.
Step 8: Testing and Commissioning
What is Testing and Commissioning in the Solar Installation Process?
After the solar panels, inverter, and electrical connections are installed, the next step is testing and commissioning. This is the final quality check before the solar system starts generating electricity.
During this stage, experienced engineers inspect every part of the system to make sure it is installed correctly and works safely. They check the electrical connections, solar panels, inverter, earthing system, and safety devices. Once all the tests are completed successfully, the solar system is switched on and begins producing electricity.
Testing and commissioning are important because they help identify and fix any issues before the system is handed over to the customer.
Why is Testing and Commissioning Important?
A solar system should never be started without proper testing. Even a small wiring mistake or loose connection can reduce performance or create safety risks.
A professional testing process helps to:
Ensure the solar system is safe to operate.
Verify that all equipment is working properly.
Confirm the system follows the approved design.
Improve electricity generation.
Reduce the chance of future problems.
Increase the reliability of the solar power system.
This step gives both the customer and the installation company confidence that the system is ready for daily use.
What Happens During Testing and Commissioning?
The installation team follows a checklist to inspect and test every major component of the solar system.
1. Visual Inspection
The first step is a complete visual inspection.
The engineer checks:
Solar panels are installed correctly.
Mounting structure is secure.
Cables are neatly arranged.
Electrical boxes are properly closed.
Safety labels are in place.
No visible damage to any equipment.
This inspection ensures the installation is complete before electrical testing begins.
2. Electrical Connection Check
Next, all electrical connections are carefully inspected.
The engineer checks:
DC cable connections
AC cable connections
Inverter connections
Distribution board connections
Circuit breakers
Isolator switches
Loose or incorrect connections are corrected before the system is started.
3. Earthing Test
The earthing system is tested to make sure it provides proper electrical protection.
A correctly installed earthing system helps protect:
Solar panels
Inverter
Electrical equipment
Building occupants
Proper earthing is an important part of every safe solar installation.
4. Inverter Testing
The inverter is one of the most important components of the system.
The engineer checks whether the inverter:
Starts correctly.
Displays normal operating values.
Detects the solar panels.
Shows no fault messages.
Produces stable output.
If any issue is found, it is resolved before commissioning is completed.
5. Solar Panel Performance Check
The performance of the solar panels is also checked.
The engineer confirms that:
All panels are connected correctly.
The system is generating electricity.
Power production is within the expected range.
No panels are disconnected or shaded unexpectedly.
This ensures the system is ready to deliver reliable performance.
6. Safety Device Inspection
All installed safety devices are inspected to confirm they are working properly.
These may include:
Circuit breakers
AC isolators
DC isolators
Surge protection devices
Distribution boxes
Proper safety equipment protects both the system and the building.
7. System Start-Up
After all inspections are completed, the engineer starts the solar system.
During start-up, they verify:
The inverter operates normally.
Electricity generation begins.
No warning messages appear.
The system responds correctly.
This is the first time the solar power system begins producing electricity.
Performance Verification
Once the system is running, the engineer compares the actual performance with the expected system design.
The verification includes:
System voltage
Current
Power output
Inverter status
Overall system operation
The results help confirm that the installation has been completed successfully.
Customer Demonstration
After testing is complete, the installation team explains how the system works.
The customer is shown:
How the inverter display works.
How to check daily electricity generation.
Basic safety precautions.
What to do if a warning message appears.
Whom to contact for support.
This helps the customer understand the system before regular operation begins.
Common Problems Found During Testing
Testing helps identify issues before the project is completed.
Some common problems include:
Loose electrical connections.
Incorrect wiring.
Faulty safety devices.
Improper earthing.
Inverter configuration errors.
Low power generation due to installation mistakes.
Finding and correcting these issues early improves the long-term performance of the solar system.
Tips for Homeowners
After commissioning, you should:
Ask the engineer to explain the inverter display.
Request all warranty documents.
Keep a copy of the installation report.
Learn how to monitor daily electricity generation.
Save the service contact number for future support.
Understanding your system makes it easier to identify any unusual changes in performance.
Step 9: Net Meter Installation and Grid Connection
What is Net Meter Installation?
After the solar system has been tested and commissioned, the next step is net meter installation. A net meter is a special electricity meter that measures both the electricity you consume from the grid and the extra electricity your solar system sends back to the grid.
During the daytime, your solar panels may generate more electricity than your home or business needs. Instead of wasting this extra power, it is exported to the electricity grid through the net meter. When your solar system is not producing enough electricity, such as at night or during cloudy weather, you can use electricity from the grid.
Net metering helps you make the best use of the electricity generated by your solar power system and can significantly reduce your electricity bills.
Why is Net Meter Installation Important?
A rooftop solar system works most efficiently when it is connected to the electricity grid through a net meter.
Net metering helps you:
Utilize excess solar energy effectively.
Reduce electricity bills.
Improve the return on your solar investment.
Track electricity import and export.
Increase the value of your solar power system.
Make better use of renewable energy.
Without a net meter, surplus electricity generated during the day may not be utilized efficiently.
How Does a Net Meter Work?
A net meter records electricity flow in two directions.
Electricity Imported from the Grid
When your solar system is not generating enough electricity, the meter records the power you take from the grid.
Examples include:
Nighttime electricity usage.
Cloudy weather conditions.
High electricity demand periods.
Electricity Exported to the Grid
When your solar system generates more electricity than you need, the extra power is sent to the electricity grid.
The meter records the exported electricity separately.
This allows the electricity distribution company to calculate your net electricity usage according to applicable regulations.
What Happens Before Net Meter Installation?
Before a net meter is installed, the electricity distribution company usually completes several checks.
These may include:
Reviewing the solar project documents.
Verifying system capacity.
Inspecting the solar installation.
Confirming safety requirements.
Checking compliance with local regulations.
The exact process may vary depending on your location and electricity provider.
Net Meter Installation Process
Once approvals are completed, the net meter installation process begins.
1. Site Inspection
A representative from the electricity distribution company may visit the site to inspect the solar installation.
The inspection generally focuses on:
Solar system capacity
Safety compliance
Electrical connections
Meter location
Grid connection readiness
2. Meter Replacement or Installation
The existing electricity meter may be replaced or upgraded with a net meter, depending on local requirements.
The new meter is capable of measuring:
Electricity consumed from the grid
Electricity exported to the grid
3. Grid Synchronization
After the net meter is installed, the solar system is synchronized with the electricity grid.
This allows electricity to flow safely between the solar system and the utility network.
4. Final Verification
The electricity distribution company performs final checks to confirm:
Proper meter operation
Correct electrical connections
Safe system performance
Compliance with applicable standards
Once verification is complete, the solar system is officially approved for regular operation.
How Long Does Net Meter Installation Take?
The installation timeline varies depending on:
Local electricity distribution company procedures
Document verification process
Inspection schedules
Project size
Regional regulations
Submitting complete and accurate documents can help reduce delays.
Benefits of Net Metering
Net metering provides several advantages for solar system owners.
Lower Electricity Bills
Excess electricity generated during the day can offset electricity consumed from the grid.
Better Return on Investment
Using exported electricity efficiently improves the financial benefits of solar energy.
Maximum Use of Solar Energy
Instead of wasting surplus electricity, the system sends it to the grid.
Environment-Friendly Energy Usage
Net metering encourages greater use of renewable energy and reduces dependence on conventional power sources.
Common Mistakes to Avoid
To ensure a smooth net metering process, avoid these common mistakes:
Delaying document submission.
Providing incorrect information.
Ignoring utility communication.
Using unapproved equipment.
Skipping required inspections.
Not understanding local net metering regulations.
Working with an experienced solar installation company can help prevent these issues.
Questions to Ask Your Solar Company
Before the net meter installation process begins, consider asking:
Will you assist with the net metering application?
How long is the expected approval timeline?
Which documents are required?
Will the electricity distribution company inspect the site?
How can I monitor imported and exported electricity?
Who should I contact if there is a meter-related issue?
These questions can help you better understand the process and avoid confusion.
How Can You Monitor Your Net Meter?
After installation, you can monitor:
Electricity generated by the solar system.
Electricity consumed from the grid.
Electricity exported to the grid.
Overall energy savings.
Many modern solar systems also provide monitoring through mobile applications, allowing users to track system performance in real time.
Step 10: Customer Handover, System Monitoring, and Maintenance
What Happens After Solar Installation?
Once the solar system is installed, tested, and connected to the electricity grid, the final step is customer handover. During this stage, the installation company officially hands over the completed solar power system to you and explains how to use it safely and efficiently.
The installation team demonstrates how the solar system works, how to monitor electricity generation, and how to perform basic maintenance. They also provide important documents such as warranty certificates, installation reports, user manuals, and service contact details.
A proper handover ensures that you understand your solar system and can enjoy reliable, clean energy for many years.
Why is Customer Handover Important?
Many people think the project is complete once the solar panels are installed. However, understanding how your system works is just as important as the installation itself.
A proper handover helps you:
Understand how your solar system works.
Monitor daily electricity generation.
Identify basic warning messages.
Keep the system operating efficiently.
Know when to contact the service team.
Protect your warranty.
A well-informed customer can get better performance and higher savings from the solar system.
What Documents Will You Receive?
A professional solar installation company provides all the important project documents after installation.
These may include:
Project completion report
Solar system layout
Warranty certificates
Product manuals
Installation report
Test and commissioning report
Net meter details (if applicable)
Service contact information
Keep these documents in a safe place because they may be needed for warranty claims or future maintenance.
How to Monitor Your Solar System
Most modern solar systems allow you to monitor performance through the inverter display or a mobile application.
You can usually check:
Daily electricity generation
Monthly electricity generation
Total electricity generated
System performance
Inverter status
Warning or fault messages
Checking your system regularly helps you identify any unusual changes in performance.
How to Read the Inverter Display
The inverter is the heart of your solar power system. It provides useful information about how your system is performing.
The display may show:
Current power generation
Daily energy production
Total energy produced
System status
Fault notifications
If you notice any warning messages, contact your solar installation company for assistance instead of trying to repair the system yourself.
Solar Panel Maintenance Tips
Solar panels require very little maintenance, but regular care helps maintain their performance.
Follow these simple maintenance tips:
Clean the Solar Panels
Dust, leaves, bird droppings, and dirt can reduce the amount of sunlight reaching the panels.
Clean the panels using:
Clean water
A soft cloth
A soft brush
Avoid using harsh chemicals, abrasive materials, or high-pressure water unless recommended by the manufacturer.
Inspect the System Regularly
Every few months, visually inspect the system for:
Dirt on the panels
Loose cables
Damaged mounting structure
Broken glass
Water leakage around installation points
If you notice any damage, contact your installer.
Keep the Area Around the Panels Clean
Trim nearby tree branches if they begin casting shade on the panels.
Removing unnecessary shade helps maintain electricity generation.
Annual Solar System Inspection
Although solar systems require minimal maintenance, it is a good idea to schedule a professional inspection at regular intervals.
A technician may inspect:
Solar panels
Inverter
Electrical wiring
Earthing system
Mounting structure
Safety devices
Overall system performance
Regular inspections help identify minor issues before they become major problems.
Common Problems That May Affect Performance
Most solar systems operate reliably for many years. However, some factors can reduce performance.
These include:
Dust accumulation
Heavy shading
Damaged cables
Faulty inverter
Loose electrical connections
Poor maintenance
Regular monitoring helps detect these issues early.
How Long Does a Solar System Last?
A professionally installed solar power system is designed for long-term use.
With quality equipment and proper maintenance:
Solar panels can generate electricity for more than 25 years.
Mounting structures are built to withstand changing weather conditions.
Inverters may require replacement during the system’s lifetime, depending on the product and usage.
Following the manufacturer’s maintenance recommendations helps maximize the life of the system.
Tips to Get the Best Performance
To keep your solar system working efficiently:
Monitor electricity generation regularly.
Clean the solar panels when needed.
Schedule professional inspections.
Avoid placing objects that create shade.
Contact your installer if you notice warning messages.
Follow the maintenance instructions provided by the manufacturer.
Small maintenance efforts can help maintain good performance over many years.
When Should You Contact Your Solar Company?
Contact your solar installation company if you notice:
The inverter displays an error or warning message.
Electricity generation drops significantly.
The solar panels are physically damaged.
Water enters electrical components.
Loose cables or damaged mounting structures.
Any unusual system behavior.
Do not attempt to repair electrical components yourself. Always seek assistance from trained professionals.
What Is a Solar System? Types, Components, How It Works & Benefits
- July 15, 2026
What Is Solar Energy for Home? How Solar works, types of solar & Benifits
- July 24, 2026